Fedora WSL
The best part of Windows is WSL...
A Linux fan

You are on Windows and you want to benefit from Linux without going all in ? Windows Subsystem for Linux (WSL for short), is the solution !
A lot of commands, tools or automations are just not available on Windows and you can get a pretty good experience of running a Linux machine for any kind of terminal usage.
You may also need to access complex dev environments that are so much easier to setup on Linux. Developing on VSCode (installed on Windows) is even possible. A deeper integration exists making it trivial to connect into WSL and install extensions.

The goal of this guide is to help you get up and running with Fedora on WSL2, help you install a few basics tools and learn the basics of DNF. Optionnally, you might also be interested in installing a few productivity tools that will start to create a curiosity for the power of terminal usage.
What's WSL ?
It's like a Linux virtual machine but there is very deep integration between Windows and this VM, it is not isolated like traditionnals VM like in VirtualBox.
How much integration is there ?
- You can access files from both machines in both directions: access Windows files from Linux and vice-versa.
- There is a network mix: if you start a web server on port 3000, you should be able to access it in Firefox from Windows on
localhost:3000. - You can start GUI apps from WSL. If the app already exist on Windows (such as Firefox) it might not be needed, but when you develop GUI apps (like in Qt) you really need to start the app and see the results without recompiling on Windows...
Setup WSL with Fedora
Just open a Powershell window and copy paste the given commands
wsl --install FedoraLinux-43
If the name FedoraLinux-43 is not found, you probably have to update WSL to the latest version !
wsl --update
It will ask you to choose a username (choose something short to simplify your future usage) and a password. The username will be shown in your shell's prompt and used as the folder to your HOME directory, something like /home/joe.
If you have other WSL installations (Docker Desktop, WSL Ubuntu, etc), you might want to define the Fedora WSL as the default.
wsl --setdefault FedoraLinux-43 # define WSL Fedora as the default
wsl # to enter
Note: The wsl command only works in Windows, make sure you are running in cmd or Powershell and not directly inside Fedora.
If later on you need to change your username
wsl --manage FedoraLinux-43 --set-default-user <newusername>
If at some time you forget your password and cannot use sudo to reset it, you can login as root with this command.
wsl -d FedoraLinux-43 -u root

# If you need to change the password of user sam
passwd sam
Filesystems
As you have basically 2 OS, you also have 2 filesystems that are accessibles on both sides.
In WSL, the Windows files from the C: drive is accessible from
/mnt/c/. On WSL, if you want to list files under your desktop folder, you can type ls /mnt/c/Users/joe/Desktop (considering the username is joe).
To try this feature, run this command in WSL to go into the Desktop folder from Windows.
cd /mnt/c/Users/joe/Desktop
Then you can run ls and you should see the same files that your Windows' desktop !
You can try to create a new empty file with touch hello.txt and looking at your Windows Explorer GUI you should see the new file.
Try to change the file in Notepad by adding hello there inside. Go back in your WSL terminal and run cat hello.txt, you should see the 3 worsd.
You can also
You can also access the files from WSL in the Windows Explorer GUI. At left you should see an entry for that and you'll see the content of /. You users files are under /home/joe (considering your Linux's username is joe). The path shown in the Windows Explorer is something like \\wsl.localhost\FedoraLinux-43\home\joe.
The most important thing to remember is to avoid slow operations that use the filesystem from the other OS because there is a HUGE performance loss! If you are on WSL but you access files from Windows (anything under /mnt/c), if you try to copy files, run npm install, do any kind of compilation... if you take just forever to run !
Make sure to store your files under /home/joe and don't forget to backup these files when you do it for your Windows files!
Remember: if anything is very slow, think about if this issue. It could be the root of the slowness you are experiencing...
Learn DNF
DNF (the command dnf) is the main package manager on Fedora. You may know the equivalent on Ubuntu (apt) or on Arch (pacman). DNF is managing packages that are created using the RPM format (they have the .rpm extension), packages are usually named like that: bottom-0.9.5-1.fc40.x86_64 (package name - version - number - fedora version (here 40) - processor architecture (here x86_64)).
apt can be installed but cannot be used on Fedora because it has another package format (.deb) than Fedora.
DNF basics
DNF has many subcommands (dnf install, dnf remove, dnf search, etc), here a few examples you REALLY need to understand and remember.
dnf install
Let's start by installing a few tools to practice using this command.
First, you can install fastfetch, which is a nice way to gather important stats about your machine. This tool is available in the Fedora's registry, that is configured by default. Because of this, you just need to run this command to install it.
sudo dnf install fastfetch
This is what you should see, you can accept the installation with y. As you can see the fastfetch package has one dependency yyjson which is also installed.
> sudo dnf install fastfetch

Updating and loading repositories:
Repositories loaded.
Package                   Arch    Version                    Repository          Size
Installing:
 fastfetch                x86_64  2.44.0-1.fc43              updates          1.5 MiB
Installing dependencies:
 yyjson                   x86_64  0.11.1-1.fc43              updates        244.2 KiB

Transaction Summary:
 Installing:         2 packages

Total size of inbound packages is 646 KiB. Need to download 646 KiB.
After this operation, 2 MiB extra will be used (install 2 MiB, remove 0 B).
Is this ok [y/N]: y
[1/2] yyjson-0:0.11.1-1.fc43.x86_64          100% | 450.5 KiB/s | 109.5 KiB |  00m00s
[2/2] fastfetch-0:2.44.0-1.fc43.x86_64       100% |   1.2 MiB/s | 536.2 KiB |  00m00s
-------------------------------------------------------------------------------------
[2/2] Total                                  100% | 993.4 KiB/s | 645.7 KiB |  00m01s
Running transaction
[1/4] Verify package files                   100% | 181.0   B/s |   2.0   B |  00m00s
[2/4] Prepare transaction                    100% |   2.0   B/s |   2.0   B |  00m01s
[3/4] Installing yyjson-0:0.11.1-1.fc43.x86_ 100% |   9.2 MiB/s | 245.6 KiB |  00m00s
[4/4] Installing fastfetch-0:2.44.0-1.fc43.x 100% | 682.0 KiB/s |   1.6 MiB |  00m02s
Complete!
The command is using sudo because the files in the packages will be extracted in folders that can only changed by root (such as /usr/bin or /etc).
Then just run it with fastfetch and look what you could find as useful in the future: the kernel version, the processor model, the amount of RAM, etc...
Try to install other tools
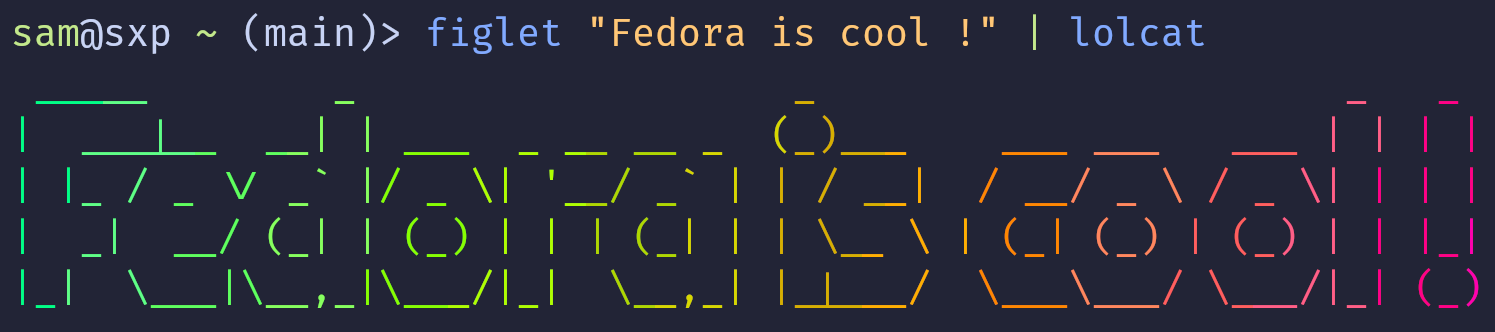
Install figlet and lolcat by reusing the same command as before.
Solution
sudo dnf install figlet lolcat
As you can see, you can easily list several packages names at once !
And now you can have fun by running that !
figlet "Fedora is cool !" | lolcat
Here is the colorful result :)
Now, let's continue by installing cowsay! Do you like cows ?
Solution
sudo dnf install -y cowsay
The -y flag is used to ignore confirmation (think of it as "the yes mode").
dnf remove
Now, I admit I helped you install some useless tools. Happily, there is a way to uninstall these packages with dnf remove.
Can you guess the full command to remove the 3 useful packages ?
Solution
sudo dnf remove figlet lolcat cowsay
dnf search
The previous packages were easy to install because they have each one a simple name and a unique package with the same name. What if you want to install something a bit harder ? You know a few keywords about the tool but not the exact name ?
There is nice tool called fd, which is the alternative to the Unix find command, which has easy to remember options. The package name is not fd nor find, can you find what's the name ?
Solution
Searching for find gives us a long list but it contains the wanted fd-find package !
> dnf search find
Updating and loading repositories:
Repositories loaded.
 assetfinder.x86_64	Find domains and subdomains related to a given domain
 fd-find.x86_64	Fd is a simple, fast and user-friendly alternative to find
 fedfind.noarch	Fedora compose and image finder
 findutils.x86_64	The GNU versions of find utilities (find and xargs)
... a long list
A way to filter the output is to filter the lines with grep, to match the other keyword fd, which gives us only 3 results.
> dnf search find | grep fd
 fd-find.x86_64	Fd is a simple, fast and user-friendly alternative to find
 fdupes.x86_64	Finds duplicate files in a given set of directories
 jdupes.x86_64	Duplicate file finder and an enhanced fork of 'fdupes'
If you add the -C option (in dnf -C search), you will use the local cache of available softwares instead of refreshing the list of packages each time on each registry.
If you want to find a particular plugin of a big framework, such as Qt, you can search with multiple keywords.
There is multimedia plugin with Qt 6, can you search that ?
Solution
We were looking for qt6-qtmultimedia and this commands finds it!
> dnf -C search qt multimedia
Updating and loading repositories:
Repositories loaded.
Matched fields: name, summary
 mingw32-qt5-qtmultimedia.noarch	Qt5 for Windows - QtMultimedia component
 mingw32-qt6-qtmultimedia.noarch	Qt6 for Windows - QtMultimedia component
 mingw64-qt5-qtmultimedia.noarch	Qt5 for Windows - QtMultimedia component
 mingw64-qt6-qtmultimedia.noarch	Qt6 for Windows - QtMultimedia component
 phonon-qt4.x86_64	Multimedia framework api for Qt4
 phonon-qt5.x86_64	Multimedia framework api for Qt5
 phonon-qt6.x86_64	Multimedia framework api for Qt6
 qt-mobility-multimediakit.x86_64	QtMultiMediaKit support
 qt5-qtmultimedia.x86_64	Qt5 - Multimedia support
 qt5-qtmultimedia-devel.x86_64	Development files for qt5-qtmultimedia
 qt5-qtmultimedia-doc.noarch	Documentation for qtmultimedia
 qt5-qtmultimedia-examples.x86_64	Programming examples for qt5-qtmultimedia
 qt6-qtmultimedia.x86_64	Qt6 - Multimedia support
 qt6-qtmultimedia-devel.x86_64	Development files for qt6-qtmultimedia
 qt6-qtmultimedia-examples.x86_64	Programming examples for qt6-qtmultimedia
...
dnf provides
When you are running some kind of scripts and it fails with a command not found errors, you probably just have to install a specific DNF package that bring this command. But which package ? It can often be the same name as the command, except when it's not the case... DNF can help you find which package provides a given command (this is why it is named dnf provides).
Let's take an example with this error
Deploying boot files into the first partition...
./deploy.sh: line 94: mcopy: command not found
> dnf provides mcopy
Updating and loading repositories:
Repositories loaded.
mtools-4.0.48-1.fc43.x86_64 : Programs for accessing MS-DOS disks without mounting the disks
Repo         : fedora
Matched From :
Filename     : /usr/bin/mcopy

mtools-4.0.49-1.fc43.x86_64 : Programs for accessing MS-DOS disks without mounting the disks
Repo         : updates
Matched From :
Filename     : /usr/bin/mcopy
The package that brings mcopy is mtools so you can just sudo dnf install mtools.
Installing from COPR
There is nice CLI called bottom with a btm command. If you check out the README of bottom, you'll see there are numerous ways to install it.
If you try to directly install it via dnf like before, it will fail with a No match for argument: bottom because the tool is not shipped in the connected DNF registries.
> sudo dnf install bottom
Repositories loaded.
Failed to resolve the transaction:
No match for argument: bottom
You can try to add to command line:
  --skip-unavailable to skip unavailable packages
You'll need to enable the COPR with the first command and then the bottom package will not be found
sudo dnf copr enable atim/bottom -y
sudo dnf install bottom
Get the most basic development environment
- Install Git: To be able to clone, commit, push and pull Git repositories, you need to install and configure Git, which needs to have SSH authenticated setup to be able to connect with your account to the Git server.
- Install GitUI: This part is optionnal, but this tool is AWESOME, if you are not convinced, please make me a favour, try it a few days and you'll like it. It takes a few tries to get used to the keyboard shorcuts.
- Get Fish the Friendly Interactive Shell: Fish is another AMAZING tool you will not regret to learn! It is extremely joyful to use without any configuration. If you spend some time learning more, you can build some very simple and nice automations.
Using VSCode with WSL
VScode is well integrated with WSL, you can have a full dev environment in WSL and connect with VSCode installed on Windows !
Open VSCode from WSL
You like the code . command to open the current folder in VSCode ?
To enable this experience, the folder with the file code must be present in the PATH variable. This file is probably in /mnt/c/Users/joe/AppData/Local/Programs/Microsoft VS Code/bin where joe is replaced by your Windows username. It's important to take folder bin and not the parent containing Code.exe is not the same program. code is used to start Code.exe.
In Fish there is a nice tool called fish_add_path that allow to add a folder in the PATH it in a persistent manner.
So, you can run this command from WSL, once you adapted the folder path.
fish_add_path "/mnt/c/Users/joe/AppData/Local/Programs/Microsoft VS Code/bin"
Then going into you SYE folder and type code . should open it. The first time you might see this message, that's expected.
> code .
Updating VS Code Server to version f220831ea2d946c0dcb0f3eaa480eb435a2c1260
Removing previous installation...
Installing VS Code Server for Linux x64 (f220831ea2d946c0dcb0f3eaa480eb435a2c1260)
Downloading: 100%
Unpacking: 100%
Unpacked 2259 files and folders to /home/sam/.vscode-server/bin/f220831ea2d946c0dc...
Looking for compatibility check script at /home/sam/.vscode-server/bin/f220831ea2d...
Running compatibility check script
Compatibility check successful (0)
To read from stdin, append '-' (e.g. 'echo Hello World | code -')
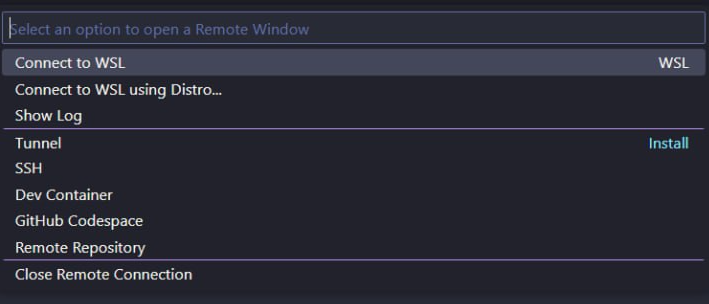
You have to make sure you are actually running in WSL, by looking at the bottom left corner. If this is not written WSL:... but just >< this is not connected, even tough you might see your files.
When clicking on this option you should see this kind of list where you can choose WSL.
Install VSCode extensions running inside WSL
Given the extension ID like usernamehw.errorlens, you can install extensions adding the --remote wsl+Fedora flag in addition to the usual command.
code --remote wsl+Fedora --install-extension usernamehw.errorlens
Make sure to precise that everytime an extension needs to have access to local programs, if they are installed in WSL, as I don't mention this detail in the rest of my cheatsheets.